Single user
Introduction
If you have read this far and are at least persuaded to try, you will want to put one of your projects under software control using Fossil. This chapter is set up to lead you through that task and show you how to adapt your development to using this tool. The assumption is made in this section that you will be the only person using the repository, you are the designer, developer, and maintainer of this project. After you are comfortable using the tool, the next section will show how you use it when you have multiple people working on a project.
Creating a repository
Introduction
In the spirit of "eating one's own dog food" we will use this book as the project we are going to manage with Fossil. The book is a directory of Markdown text files and the current working area looks like this:
fossilbook3
├── content
│   ├── book.md
│   ├── image
│   │   ├── book
│   │   │   └── fossil.png
│   ├── index.md
│   └── introduction.md
├── makefile
└── make-pdf
    └── pdf-break.md
This took just an hour or so to start preliminary research and build the framework. Since that's about all I'm going to do today I want to build a repository and put all this stuff under Fossil control.
Create repository
I have a directory called FOSSIL in which I keep all my repositories, Fossil doesn't care but it helps me to keep them all in one place so I can back them up. First I need to create a new repository for the book. This is done using the command line after I move into the Fossil book directory.
$ fossil new ../FOSSIL/FossilBook.fossil
I create my repositories with the extension .fossil, this will be useful later with the server command. When the create happened it assigned an initial password with an admin user of "jim" (i.e. me).
Connect repository
The repository is created but is empty and has no connection to the fossilbook3 directory. The next step is to open the repository to the fossilbook3 directory with the open command.
$ fossil open ../FOSSIL/fossilbook3.fossil
The open command seemingly did nothing but checking with the status command shows the repository, the directory it's linked to and that we are hooked to the trunk of the store.
$ fossil status
repository:   /home/jim/FOSSIL/fossilbook3.fossil
local-root:   /home/jim/fossilbook3/
config-db:    /home/jim/.config/fossil.db
checkout:     21e43f604387da163ea84f0d2f73cbaefff0f681 2020-11-23 18:46:21 UTC
parent:       2baae1d5fb4865028ba9f4b104f8fed2f9b44094 2020-11-23 12:45:17 UTC
tags:         trunk
comment:      initial empty check-in (user: jim)
The extra command shows all the files in the directory that are NOT under control of Fossil. In this case that's all of them since we have not checked in anything.
content/introduction.md
Add and initial commit
I must now add all the relevant files into the repository with the add command. The Fossil add is recursive so if I add the top level files it will automatically recurse into the subdirectories and get those files too. Before you do an add it pays to tidy up your directory so you don't accidentally add a bunch of transient files (like object files from a compile). It's easy to remove them later but a little tidying before hand can save you some work.
$ fossil add .
I simply told fossil to do an add of the current directory (.) so it got all those files and all the files in the subdirectory. Note the -FOSSIL- or .fslckout (depending on your operating system) that it didn't add. This is the tag file that fossil keeps in a directory so it knows what repository it belongs to. Fossil won't add this file since it manages it, but everything else is fair game.
One final thing before I can quit for the day, these files have been added or rather they will be added to the repository when I commit it. That must be done and then we can relax and let Fossil manage things.
$ fossil commit -m "Initial Commit"
I added a comment on the commit and it's a good idea to always do this. When later we see the timeline of the commits you will have notes to tell you what was done.
Fossil start up summary
fossil new <name>
Creates a new fossil repository.
fossil open <repository>
While in a source directory connects this directory to the fossil repository.
fossil add .
Will add (recursively) all the files in the current directory and all subdirectories to the repository.
fossil addremove
Will (recursively) add any files that have been added in the current working directory and delete any files that have been deleted in the current working directory.
fossil commit -m "Initial Commit"
Will put all the currently added files into the repository.
Set up user interface
One of the surprising features of Fossil is the webserver. This allows it to have a GUI type user interface with no operating system specific code, the GUI is the web browser supplied by your OS. In the previous steps I checked in my project to a Fossil repository, next I have to prep the web interface for production use.
NOTE The Fossil web server uses the first available port starting at 8080 instead of the standard port 80 for all HTTP access. When run it will automatically start your Web browser and open the repository home page.
NOTE: Fossil automatically finds an open port and will give a message on the command line telling you what port number is used. You can still use the -port option if you want to control the port #.
fossil ui
This shows how it's started. When I do this my browser starts if it is not running already and I am presented with the following home page.
Following the advice on the page I go to setup/config. I am going to do the minimum setup that you should do on all projects. As you get familiar with Fossil you will probably have many more things that you will customize for your taste but what follows are the only things you HAVE to do.
I have entered in a project name and put in a description, the project name will be the name of the initial Wiki page (see [sub:Wiki-Use]) and the description is useful for others to see what you are doing here. Then I go to the bottom of the page and pick the Apply Changes button.
Next I pick the Admin tab (you can see it in the header bar) and the pick Users from that page. I am presented with the users and will use this to set the password of the project.
As you can see Fossil automatically configures a number of users beyond just the creator. The anonymous user you have already seen if you went to the Fossil web site to download the code. This user can view and get code but cannot commit code. On the right side of the page are the many options you can give to a user, it's worth reading it all when you set up your repository. The important one is me (jim) which has "s" or Super User Capabilities. This means I can do anything with the repository.
I will now edit the user Jim to make sure it has the settings I want. In this case you MUST set the password. Remember way back where Fossil set it during the create (Figure[fig:Create-Repository]), it's a very good idea to change this to something you can remember rather than the original random one.
I have put in my contact information (e-mail address) and while you cannot see it I have typed in a password that I will remember. Then I applied the changes.
Now the repository is ready for further work, it's rather bare bones at this point but the most important things are set up.
User interface summary
fossil ui
Run in the source directory will start a browser based user interface to fossil.
fossil ui -port <IP port #>
Can be used if port 8080 if already in use on your system.
On the first run it is important to configure your project with a name and set the password for yourself.
Update repository
After writing the above section of the book I now have created a some new files and changed some of the existing files in the repository. Before quitting for the day I should add these new files into the repository and commit the changes saving this milestone in the project.
$ fossil extra
I run fossil extra to see these new files. Choose the ones to added and note if there are any perhaps temporary files that should NOT be stored in the repository. I also ran fossil status. This shows changes to files that are already in the repository. The only files changed are content/introduction.md and content/single-user.md.
All I have to do now is add in the directory content/image which will add in the image files I want in the repository. Then I commit the changes to the repository and we can move on to other tasks of the day.
fossil add content/image
After doing this commit I can bring up the Fossil ui and view the project Timeline by picking that tab on the Fossil header. We get this:
Timeline
You can see all my check-ins thus far and you can see after the check-in from Figure [fig:Update-for-new] I did another check-in because I missed some changes in the outline. The check-ins are labeled with the first 10 digits of their hash value and these are active links which you can click to view in detail what was changed in that version.
I clicked on the very last check-in (the LEAF) and the display is shown above. There are many things you can do at this point. From the list of changed files you can pick the diff link and it will show in text form the changes made in that particular file. The "Other Links" section has a very useful ZIP Archive. Clicking this will download a ZIP of this version to your browser. You will find this useful if you want to get a particular version, in fact this is normally how you get a new version of Fossil from the http://www.fossil-scm.org/. The edit link will be used later to modify a leaf.
Update summary
fossil status and fossil extra will tell you the updated files and files not in the repository before you commit.
fossil commit - m "Commit comment" Commits a change (or changes). It is very important to have a descriptive comment on your commit.
Tickets
Besides managing your code Fossil has a trouble ticket system. This means you can create a ticket for a problem or feature you are going to add to your system then track your progress. Also you can tie the tickets to specific check-ins of your files. For software this is very useful for bug fixes and feature additions. For example you can look for a bug in the ticket list then have it take you to the change that fixed the problem. Then you know exactly what you did and not have to be confused by other changes you might have made.
When you pick Tickets it will bring up this window. You can create a new ticket, look at the list, or generate a new report. Keeping things simple I will just use the All Tickets list for now.
Initial Ticket Window
Picking "New Ticket" I get a form that I fill out like so:
Ticket Form
Pretty simple actually. You can put as much or as little detail in here as you wish, but remember this stuff might be really vital 6 weeks or 6 months from now so think of what you would want to know then. When I press Submit I get this showing what I entered.
Viewing a Ticket
Finally picking Tickets then "All Tickets" I can see my new ticket in the list marked as Open and in a distinctive color.
Ticket List with open ticket
I try, in handling tickets, to have links from ticket to the commit that addressed the problem and a link from the commit back to the offending ticket. This way looking at the ticket I can get to the changes made and from the timeline I can get the the ticket and its resolution. To do this I will make sure and put the 10 digit hash label from the ticket into the check-in comment and put a link in the resolved ticket to the check-in.
Since I have now written the chapter and put in all these images of what to do I can now add in all the new images to the repository and check this in as another completed operation. And I do that like this:
Pandora-2:jschimpf/Public/FossilBook] jim% fossil add Images/Single-user
First I added in all the new image files. I am lazy and just told it to add in all the files in the Single-user directory. I have previously added some of those like config-initial.epsf but Fossil is smart and knows this and won't add that one twice. Even though it shows it ADDED, it really didn't.
The commit line is very important, as you can see I put 10 digit hash code for the ticket in brackets in the comment. As we will see in the Wiki section this is a link to the Ticket, so when viewing the comment in the Timeline or elsewhere you can click the bracketed item and you would go to the ticket.
Now that I have the items checked in I have to close the ticket. I do that by clicking on its link in the ticket list, that will go the the View Ticket window as shown in Figure [fig:viewticket]. From there I pick edit and fill it in as shown:
I mark it as "Closed". If you have code you can mark this as fixed, tested, or a number of other choices. Another very important step, I brought up the Timeline and copied the link for the commit I had just done in Figure [fig:checkin]. By doing this my ticket is now cross linked with the commit and the commit has a link back to the ticket.
Ticket summary
Tickets are a useful way of reminding you what needs done or bugs fixed
When you commit a change that affects a ticket put the 10 digit hash label of the ticket into the commit comment surrounded by brackets, e.g. [<10 digit hash>] so you can link to the ticket
When you close the ticket put in the hash label of the commit that fixed it.
Wiki use
As we saw in Figure [fig:Starting-Webserver] Fossil has a browser based user interface. In addition to the pages that are built in you can add pages to web site via a wiki. This allows you to add code descriptions, user manuals, or other documentation. Fossil keeps all that stuff in one place under version control. A wiki is a web site where you can add pages and links from within your browser. You are given an initial page then if you type [newpage] this text will turn into a link and if clicked will take you to a new blank page. Remember in Figure [fig:Initial-Webserver-page] that is the initial page for your project and from there you can add new pages. These pages are automatically managed by the Fossil version control system; you don't have to add or commit.
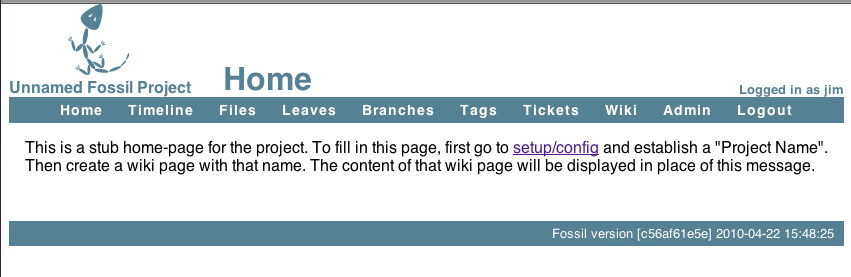
Since I did the setup on repository (see Figure [fig:Initial-Configuration]) the home page has changed to this:
Not very helpful so the in rest of this chapter I will use the Wiki functions of Fossil to make this more useful. If I pick the Wiki item from the menu bar I get:
These are the controls that let you control and modify the wiki. Most important for now is the Formatting rules link. This link takes you to a page that describes what you can do to format a wiki page. If you just type text on a page it will appear but be formatted by your browser. You can type HTML commands to control this formating. It's worth your time to carefully read this page and note what you can and cannot do. The page just lists the valid HTML commands, and if you don't know what they mean I would suggest you find a page like this http://www.webmonkey.com/2010/02/html-cheatsheet/ and keep it handy.
Besides the HTML markup the most powerful command for the Wiki is [page] where it links to a new page. This is how you add pages and how you build your web site of documentation for the repository.
Wiki formatting
I now begin work. What I want to do is change the home page to be non-empty and also put a link on the home page to the PDF of this book. In Figure [fig:Wiki-controls] I click on the first item, the FossilBook home page. This takes me to the home page again but now I have an Edit option. We also have a History option so I could look at older versions of the page.
This shows my initial edit and a preview:
| The bottom section is an edit window where I type things I want displayed and the top is a preview of what the page will be. As you can see I typed some simple HTML to make a large and centered title. The body of the text I just typed and as you see the browser fits the text to the screen. You can have multiple paragraphs by just putting blank lines between your text. Next I wanted a bulleted list and this is done by typing two spaces, a '*' then two more spaces. On each of these lines I have a link to a new (not yet created page). If you look I put these in the form [ <new page> | <title> ]. This way I can have a long string that describes the link but have a nice short (no embedded spaces) page name. |
|---|
One mistake I usually make at this point is to click one of those new links which takes me to a new blank page. OOPS, if I have not saved this page yet then I find I've lost my changes so far.
OK, I will save my changes and then go to the new pages. I am doing some complicated things here. The first link is to the book PDF. This will be a file I create in the repository. The LyX program I'm using creates the PDF. I will do that, save it, and add it to the repository. But I don't want to link to a static file, that is I want the most current version of the PDF, the one I save each time I quit for the day. To do this we have to put in a link that looks like this:
| [http:doc/tip/FossilBook.pdf | Book (pdf) ] |
|---|
This is a special link the Fossil wiki understands, doc says this is documentation. tip says use the most current version; you could put a version link here. And finally since I am going to put the book PDF at the top level I only need the file name. If it was in a subdirectory I would have to say doc/tip/subdir/filename.
The second link is just to a regular page and I can just edit that one just like I did this the main page.
Wiki summary
Format your text using HTML commands like <h1>Title</h1> for page headings
Create and link pages using [ <page> <Link text> ] The page designation http:doc/tip/<document path relative to repository> will display any document in the repository that your browser can handle (i.e. pdf, http etc)
Never click on a link till AFTER you have saved the page